As glass lamination technology advances, the demand for precise, efficient tools to ensure top-quality results grows. E-Seal silicone vacuum bags have become essential to this process, offering durability, heat resistance, and flexibility. Unlike traditional vacuum bags, E-Seal bags provide an exceptional airtight seal, enabling flawless adhesion in complex, multi-layer glass laminations.
But what exactly makes these bags so effective, and how can you use them to their maximum advantage? In this guide, we’ll explore the features that set E-Seal vacuum bags apart, along with practical tips for selecting the right size, material, and nozzle configuration.
Whether you’re new to glass lamination or looking to optimize your setup, this blog will equip you with the knowledge needed to make informed decisions and achieve outstanding results. Read on to unlock the full potential of vacuum silicone bags for your glass lamination projects in 2025 and beyond.
What are Silicone Vacuum Bags?
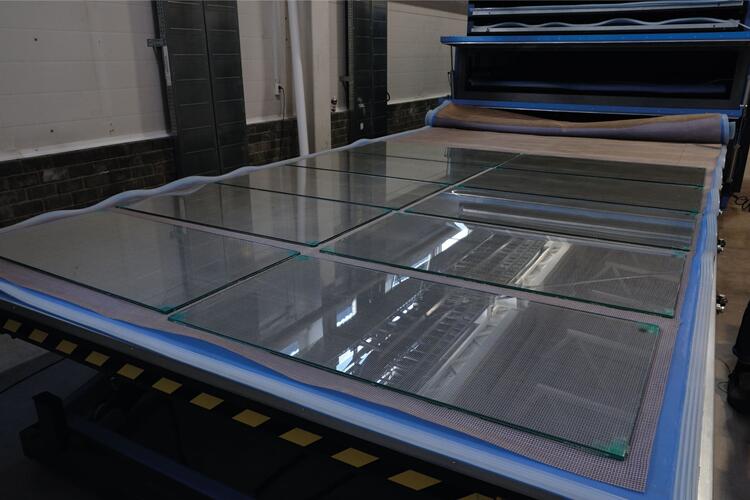
In glass lamination, achieving a seamless, durable bond between glass layers is critical. Vacuum bags are at the heart of this process, creating a controlled environment where air is removed to prevent imperfections, such as bubbles or weak adhesion, between the glass and interlayer materials like EVA or PVB. These bags are designed to withstand the high temperatures and pressures used in lamination furnaces, ensuring a strong, clear, and long-lasting final product.
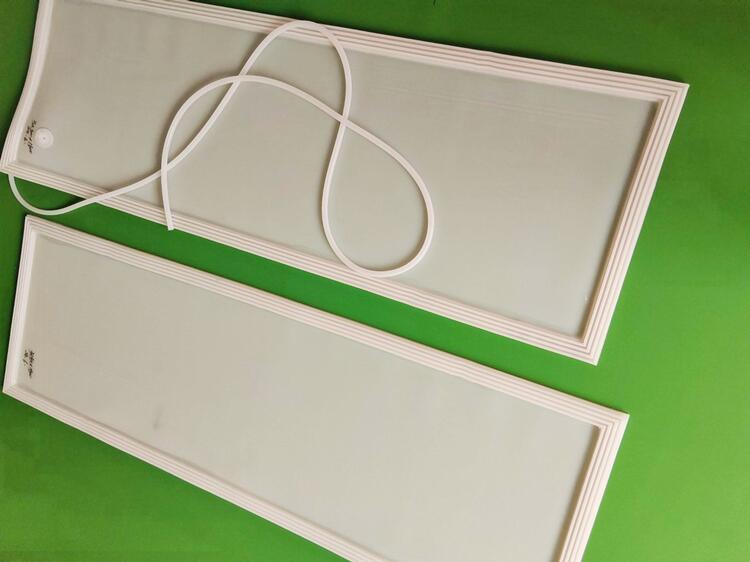
Silicone vacuum bags are particularly valued in the industry for their flexibility, heat resistance, and durability. Among these, E-Seal silicone vacuum bags stand out, offering an airtight seal that makes them ideal for complex and thick glass laminations. Unlike bags with a simpler, U-shaped seal, E-Seal bags feature a ribbed edge that locks the two layers of silicone sheets together tightly, maintaining a vacuum seal even during intense heating and cooling cycles. This unique design minimizes the risk of air leaks, ensuring consistent quality across large or multi-layered glass projects.
Key Considerations for Glass Manufacturers
- Understanding the role of vacuum bags is crucial.
- Choosing the right type of bag—whether for basic laminations or complex, curved glass applications—can significantly impact both the efficiency of the process and the quality of the finished product.
- Customization Options: E-Seal bags are often customizable, with options for nozzle locations, outer sizes, and PTFE open mesh sheets to suit specific requirements.
This article delves into the details of vacuum sealers silicone bags, providing insights to help you select, use, and maintain the right bag for processing of composites and glass. Whether you’re upgrading your equipment or optimizing an existing system, the best silicone bag can make all the difference in achieving precision and reliability in glass lamination.
Why Silicone Rubber is the Ideal Material for E-Seal Bags
Silicone rubber has become the preferred material for E-Seal vacuum bags in glass lamination due to its unmatched resilience, adaptability, and durability. Here’s why silicone rubber is essential for these high-performance bags:
- Heat Resistance:
Silicone rubber can withstand temperatures up to 250°C (482°F) without losing shape or integrity, making it ideal for lamination machines that require high and stable heat. This temperature tolerance ensures that E-Seal bags can endure multiple heating cycles without degrading, providing consistent performance over time.
- Flexibility and Elasticity:
The natural flexibility of silicone allows E-Seal bags to form a snug fit around the glass and interlayer adhesives, ensuring uniform pressure distribution. This close fit is crucial for preventing air bubbles and achieving flawless adhesion, especially in thicker or multi-layer glass laminations.
- Airtight Sealing:
The ribbed design of E-Seal bags, combined with silicone’s elasticity, ensures a secure and airtight seal. This feature is essential in maintaining vacuum integrity throughout the heating and cooling process, even in high-stress environments, helping produce a smooth, durable laminated glass.
- Chemical Resistance:
Silicone rubber is highly resistant to many chemicals and adhesives commonly used in glass lamination. This chemical resilience ensures that E-Seal bags remain unaffected by volatile substances caused from EVA or PVB, maintaining their durability and effectiveness in various production settings.
- Non-Stick Surface:
Silicone’s non-stick properties prevent materials from adhering to the bag, making it easy to clean and maintain. This feature not only simplifies bag care but also extends the bag’s lifespan, providing long-term reliability.
In summary, silicone rubber’s unique combination of heat tolerance, elasticity, and chemical resistance makes it the ideal material for E-Seal vacuum bags. These properties support high-quality, efficient lamination processes and help manufacturers achieve consistent, professional results in demanding production environments.
How to Make a Vacuum Bag for Glass Laminating
Creating a silicone bag requires the expertise of skilled technicians whose precision and dedication turn a complex process into a reliable solution. Their attention to detail ensures each bag meets the highest standards, offering airtight sealing, durability, and consistent performance. This meticulous craftsmanship allows clients to trust the product for even the most demanding applications. Let’s explore the key steps involved in this process:
1. Measure the Glass Dimensions
- Begin by accurately measuring the maximum dimensions of the glass sheets intended for lamination.
- These measurements are crucial to ensure the silicone vacuum bag fits snugly over the glass, covering its entire surface.
- Mark the measurements precisely on the silicone sheet to avoid any size discrepancies.
2. Cut the Silicone Sheets
- Using a sharp knife or heavy-duty scissors, cut the silicone material along the marked lines.
- Ensure the cuts are smooth and straight to avoid tears or irregularities in the final bag.
- Maintaining clean edges is essential for a tight seal during the lamination process.
3. Bond the Four Edges with E-Seals
Attach E sealing strips along the four edges of the silicone sheets, requiring skilled technicians for precise alignment.
- This ensures a tight interlocking fit, making closure easy and secure during the glass lamination process.
- This careful work ensures the product is reliable, even for the toughest tasks.
4. Apply Silicone Sealant Along the Edges
- For a secure, airtight seal, apply a thin layer of silicone sealant along the newly sealed edges.
- This step is crucial to prevent air leaks during vacuuming.
- Allow the sealant to cure completely before proceeding to the next steps.
5. Install the Vacuum Nozzles
- Attach one or more vacuum nozzles as per the customer’s requirements near the open end of the bag.
- These nozzles control the vacuum pressure inside the bag during the lamination process.
- Secure each nozzle tightly to prevent air leakage. Correct positioning is essential for efficient air removal and optimal adhesion.
6. Test the Vacuum Bag
- Place a glass sheet inside the completed vacuum bag, close the open end, and connect the vacuum hose to a vacuum pump.
- Turn on the pump and monitor the bag’s ability to form a tight seal around the glass, ensuring all air bubbles are removed.
- This test confirms the bag’s functionality before regular use.
7. Inspect and Maintain
- Regularly inspect the vacuum bag for any signs of wear, tears, or damage that might affect performance.
- Timely replacement of damaged bags is essential to maintain consistent quality in the lamination process.
By following these steps, you can create a reliable vacuum bag that will perform well under the rigorous conditions of glass lamination. This process ensures that the bag maintains an airtight seal, withstands high temperatures, and provides consistent pressure for optimal lamination results.
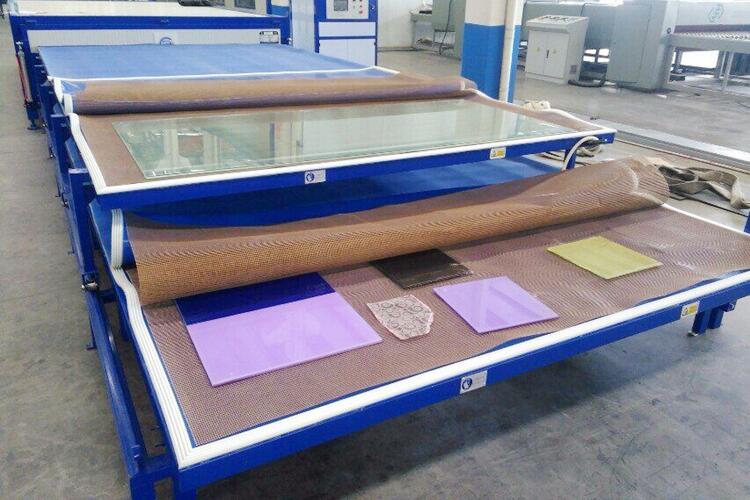
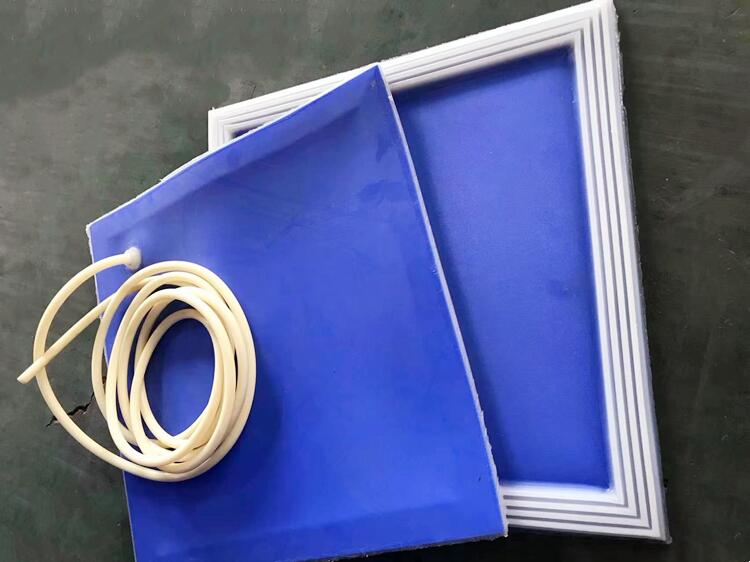
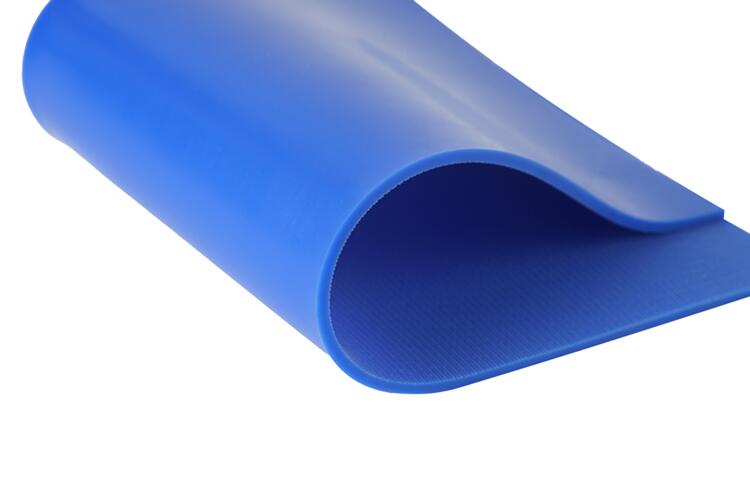
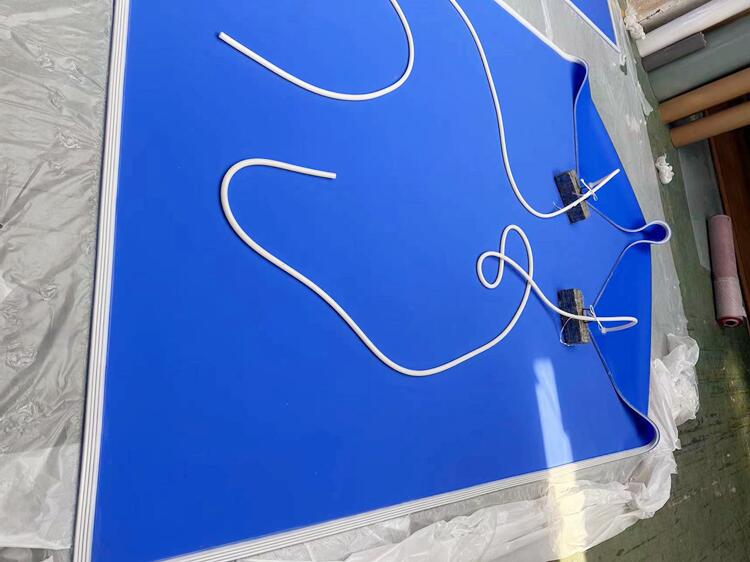
Choosing the Color and Surface for E-Seal Bags
- E-Seal silicone vacuum bags are available in two standard colors: blue and white.
- While color does not impact product quality or performance, blue has become the commonly preferred option for most applications. White bags can also be produced upon request if a larger quantity is required.
Surface Features
- Each silicone sheet used in E-Seal bags has two distinct surfaces:
- Smooth surface
- Textured surface (used as the internal working surface).
The textured side enhances grip and ensures even air distribution during the lamination process. Ultimately, the color choice and surface finish should align with your operational needs without affecting the bag’s performance.
Determining the Correct External Size for Optimal Fit
Choosing the right external size for an E-Seal vacuum bag is essential to ensure both efficiency and durability in glass lamination. A well-fitted bag enhances vacuum performance, reduces the potential for leaks, and protects the bag from unnecessary wear. Here’s how to determine the optimal fit:
- Max Size of the Glass
Start by accurately measuring the length and width of the largest glass piece to be laminated. This ensures the bag can fully accommodate the glass without stretching or bunching.
- Allow Extra Space
Select a bag size that’s slightly larger than the glass dimensions to create a secure vacuum seal around the edges. This additional space enables the bag to form a snug, airtight fit over the glass and interlayer materials.
- Consider Oven Space
Confirm that your chosen bag size fits comfortably within the internal dimensions of your lamination oven. Oversized bags can lead to inefficient heat distribution or may not fit properly.
- Consult with Your Machine Supplier
If you have custom-sized requirements, consult your supplier to produce a bag that precisely meets your specifications for both glass dimensions and oven size.
By carefully determining the external size, you’ll optimize the bag’s effectiveness, achieve consistent lamination quality, and extend the bag’s lifespan.
Understanding Vacuum Nozzles: Types and Functions
Vacuum nozzles are essential components of silicone vacuum bags, enabling efficient air extraction and creating the airtight seal necessary for effective glass lamination. The right nozzle choice—whether silicone or metal—can impact cost, durability, and overall performance. Here’s a breakdown of the key features of each type:
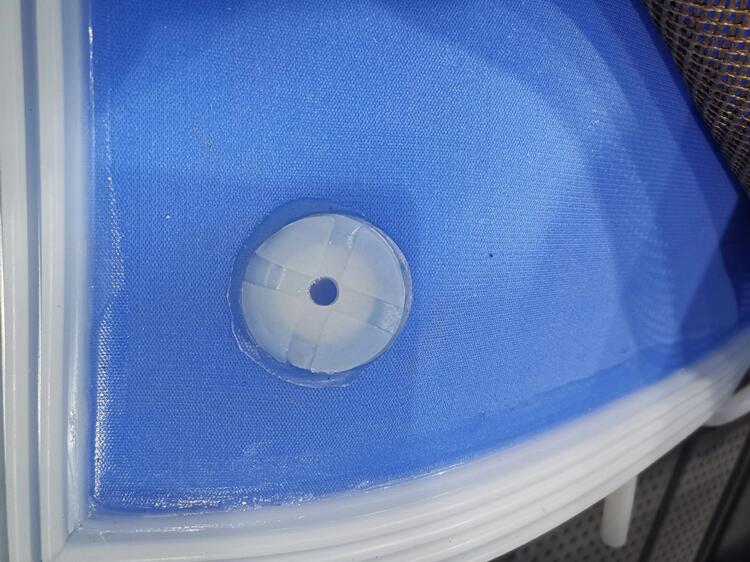
Silicone Nozzles
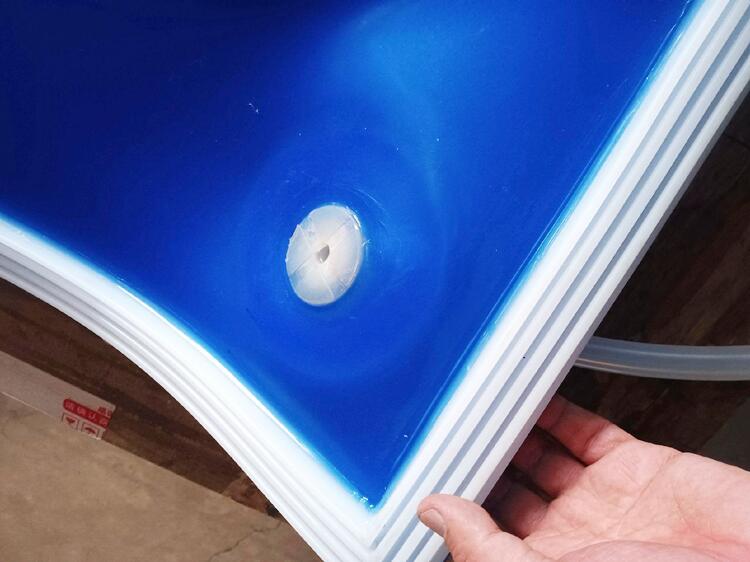 | 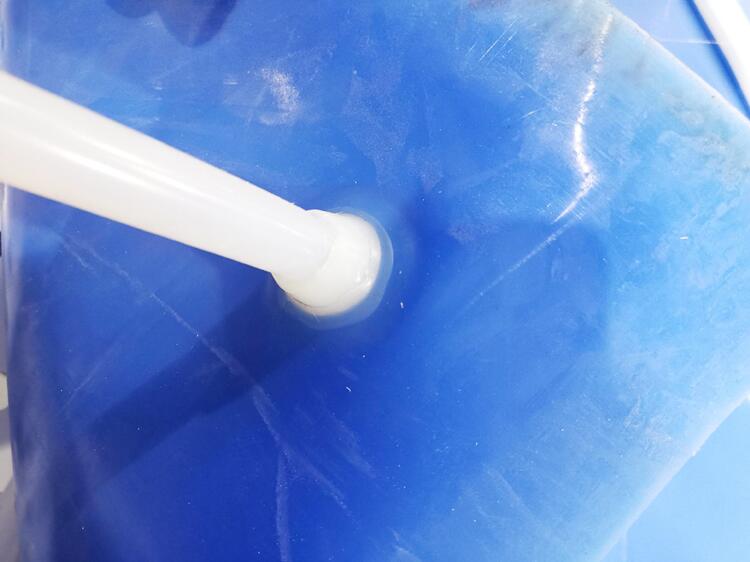 |
| Interior view for a silicone nozzle | Exterior view for a nozzle connecting the hose |
- Cost-Effective: Standard and widely used due to affordability.
- Durable: Designed to withstand frequent use and high temperatures, suitable for most glass lamination applications.
- Flexible: Provides a reliable seal and is generally used as part of the standard bag assembly.
Metal Nozzles (often aluminum)
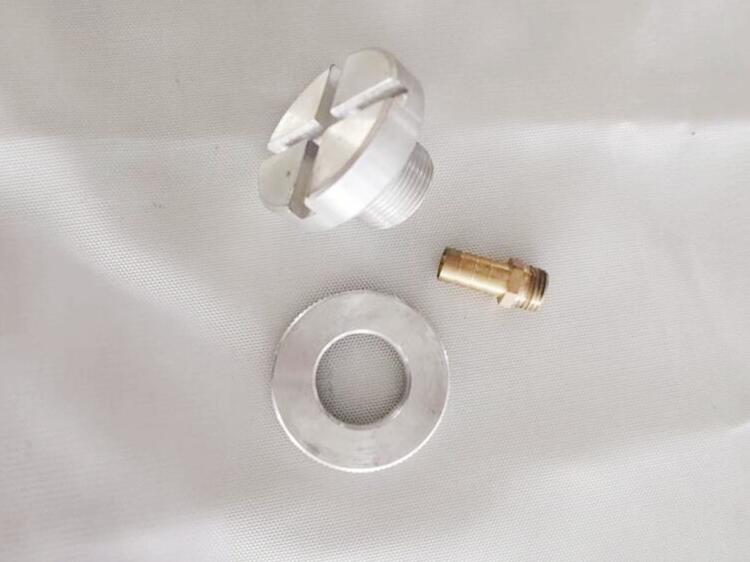 | 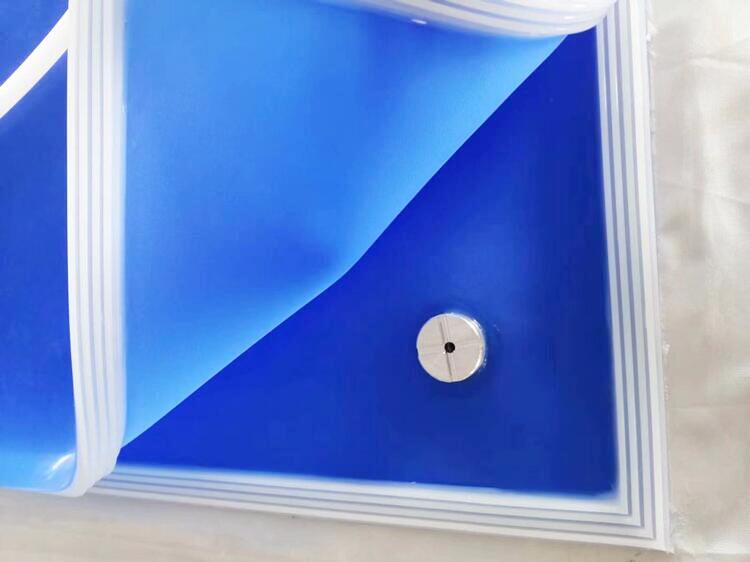 |
| Full view for this metal nozzle | Metal nozzle on the working surface |
 | 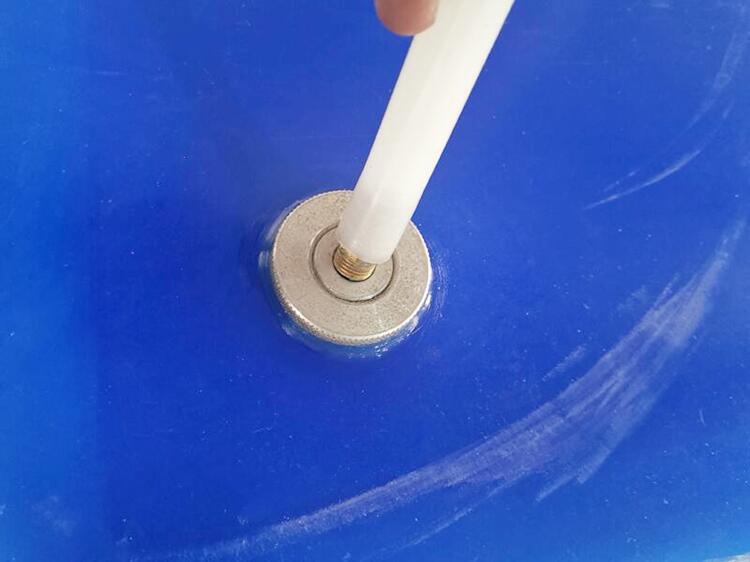 |
| Exterior view for a metal nozzle | Metal nozzle connecting the hose |
- Additional Cost: Available upon request for an additional fee of $20 per piece.
- High Durability: More resistant to wear and may be preferred in high-intensity or high-frequency applications.
- Rigid Structure: Offers a strong, long-lasting seal but lacks the flexibility of silicone.
Ultimately, the choice of nozzle material depends on your specific needs and budget. Silicone nozzles are often sufficient for most applications, but metal nozzles can be a worthwhile investment for projects requiring extra durability.
Deciding on the Quantity of Nozzles Needed
The number of vacuum nozzles used in a silicone vacuum bag impacts the efficiency and quality of the lamination process. Choosing the right quantity ensures even air extraction, minimizes air pockets, and supports a reliable vacuum seal. Here’s how to determine the optimal number of nozzles:
- Size of the Glass
- For smaller glass pieces, a single nozzle is often sufficient to create a secure vacuum.
- For larger or complex laminations, using multiple nozzles can significantly improve the air evacuation process.
- Glass Thickness and Shape
- Thicker or curved glass requires more vacuum pressure to maintain a tight seal.
- Multiple nozzles positioned along the bag provide balanced air extraction across the entire surface, preventing weak spots in the seal.
- Production Speed Requirements
- For faster production processes, multiple nozzles allow quicker air evacuation, reducing setup time and enhancing overall efficiency in high-output settings.
- Multi-Layer Laminations
- When working with multi-layer or intricate glass laminations, using two or more nozzles helps achieve uniform vacuum distribution, resulting in higher-quality lamination with fewer air pockets.
In summary, we can provide 1, 2, 4, 5, or more nozzles based on customer requirements and specific operational needs. The ideal number depends on your lamination setup and usage environment, and we are ready to customize according to these specifications.
Positioning the Nozzle for Maximum Efficiency
The placement of the vacuum nozzle in a silicone vacuum bag is critical to achieving a smooth, efficient lamination process. Correct positioning ensures even air removal, reduces the chance of air pockets, and enhances the bag’s overall performance. Here are key considerations for optimal nozzle positioning:
On the Top Pad or the Bottom Pad?
- For E-seal bags, there’s no inherent difference between the top pad and the bottom pad before the nozzle is added.
- Both layers are bonded with identical E-seal strips around the edges, and each has a textured working surface, making them functionally the same.
- Clients should specify in advance whether they would like the vacuum nozzle installed on the top or base layer.
Once the vacuum nozzle’s placement is decided, lay the selected silicone sheet flat on the worktable with the textured working surface facing up. The following options are available for positioning:
Nozzle Placement Options
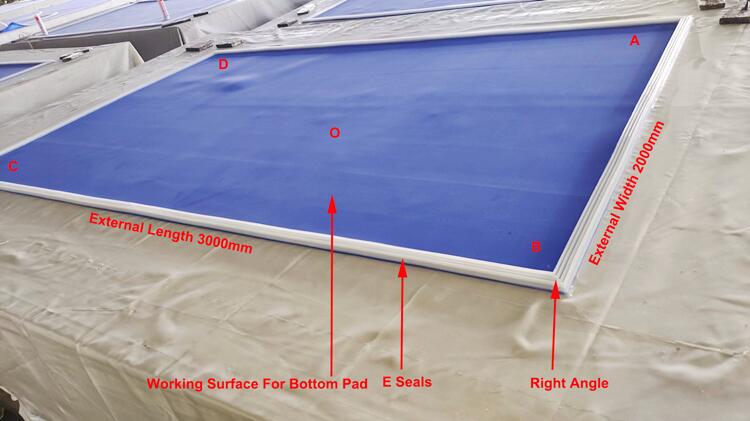
- On the Short Side
- Options: Position at A & B or C & D.
- Description: Place the nozzles along one of the shorter edges of the silicone sheet for balanced air evacuation.
- On the Long Side
- Options: Position at A & D or B & C.
- Description: Ideal for larger glass pieces, placing nozzles along the longer edge helps with efficient air removal over extended lengths.
- On the Diagonal
- Options: Position at A & C or B & D.
- Description: Diagonal placement can ensure even air distribution, particularly for irregularly shaped glass laminations.
- On the Four Corners
- Options: A, B, C, D.
- Description: Placing nozzles on all four corners maximizes vacuum efficiency for larger or more complex laminations.
- In the Middle
- Option: Position at O.
- Description: Center positioning is suitable for smaller laminations, ensuring uniform vacuum across the bag.
Important Note
- Typically, each nozzle (A/B/C/D) is positioned 150 mm from the outermost edge.
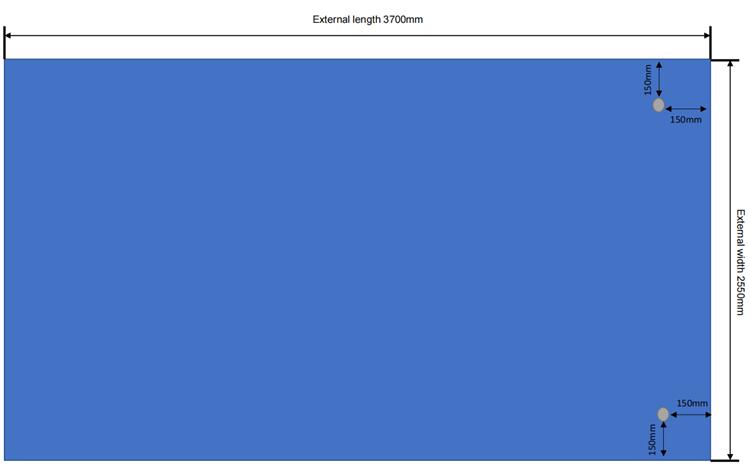
- If a different distance is required, please inform us in advance to accommodate your specific needs.
Correct nozzle positioning can significantly improve lamination quality, providing a secure, bubble-free bond and ensuring consistency across all projects.
Selecting the Right Vacuum Hose for Your Setup
Vacuum hoses serve as the essential link between the silicone vacuum bag and the vacuum machine, playing a critical role in maintaining a consistent vacuum seal. The size, length, and material of the hose should match your specific lamination requirements for optimal performance.
Diameter Options
The diameter of the vacuum hose determines the speed and efficiency of air extraction. Below are commonly chosen sizes based on customer needs:
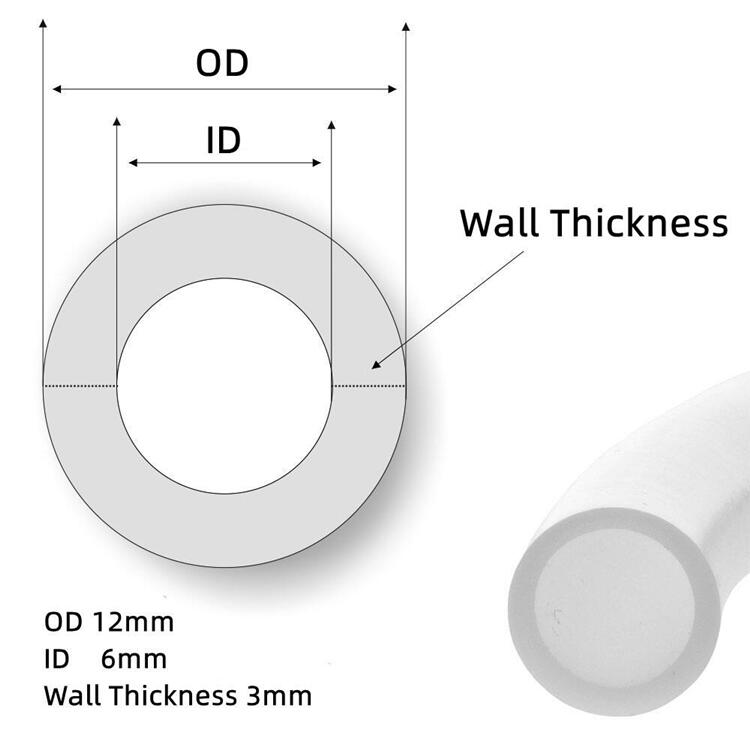
| Hose Option | Inner Diameter (ID) | Outer Diameter (OD) |
|---|---|---|
| Nozzle 1 | 6mm | 12mm |
| Nozzle 2 | 9mm | 17mm |
| Nozzle 3 | 10mm | 20mm |
- Preferred Choice: Approximately 70–80% of customers select hoses with an OD of 12mm and ID of 6mm for standard applications.
- For Larger Setups: Around 20–30% of customers opt for OD of 20mm and ID of 10mm for setups requiring faster air evacuation, such as thicker or larger laminations.
Length Customization
- Standard Length: 2 meters.
- Custom Lengths: Available upon request (e.g., 3 meters, 5 meters, or more), depending on production needs and equipment configurations.
Shorter hoses allow for quicker air removal, while longer hoses suit larger setups.
Choosing the right vacuum hose in terms of diameter, length, and fit ensures reliable performance, efficient air extraction, and compatibility with your lamination process.
The Role of PTFE Mesh Sheets in Laminated Glass Production
PTFE mesh sheets play a vital role in laminated glass production, enhancing both the quality and efficiency of the lamination process. Their primary functions include:
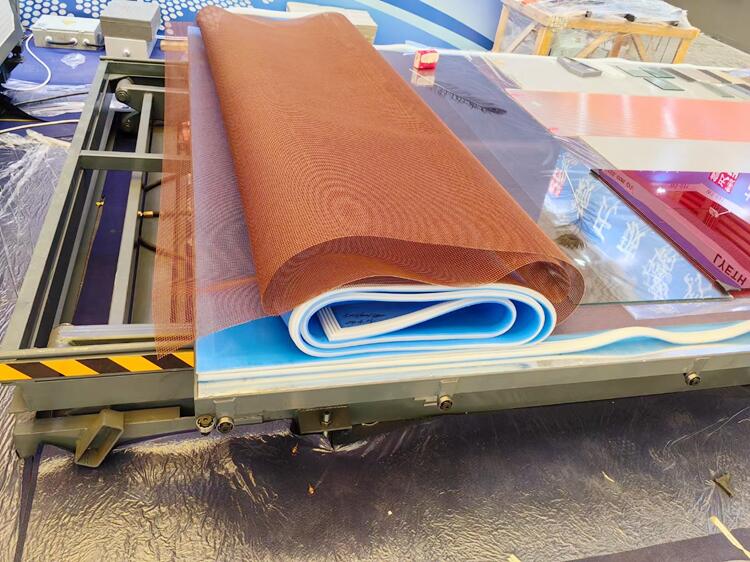
- Heat Resistance
- PTFE (Teflon) mesh is highly resistant to extreme temperatures, making it ideal for the high-heat environment of lamination ovens. This ensures the mesh maintains its structure, even under intense conditions.
- Non-Stick Surface
- Prevents glass or interlayer materials from adhering to the mesh, simplifying cleanup and reducing maintenance.
- Even Air Flow
- Facilitates uniform air evacuation, reducing “false vacuum” areas that could lead to incomplete lamination.
- Protective Barrier
- Shields the vacuum bag from sharp glass edges, prolonging its life.
Recommendation: Double weft 4mm x 4mm PTFE open mesh sheets are ideal for optimal results.
By using PTFE mesh sheets, manufacturers achieve high-quality, bubble-free lamination while extending vacuum bag durability.
A Step-by-Step Guide on Using E-Seal Bags for Lamination
E-Seal bags are essential for achieving high-quality, bubble-free glass lamination. Here’s a step-by-step guide on how to use them effectively:
1. Prepare the Glass and Interlayer
- Thoroughly clean the glass surfaces.
- Place the interlayer material (EVA or PVB) between the glass sheets to prevent dust or particles from affecting adhesion.
2. Position the Glass Assembly in the Bag
- Place the glass and interlayer assembly into the lower layer of the E-Seal bag.
- Align the setup on the PTFE mesh, if used, to ensure even air distribution.
3. Seal the Bag Securely
- Press along the ribbed edges to create an airtight seal.
- The E-seal design ensures a firm lock and maintains vacuum pressure.
4. Connect the Vacuum System
- Attach the vacuum hose securely to the bag’s nozzle.
- Start the vacuum pump to remove air, ensuring the bag tightly conforms to the glass.
5. Heat and Cure in the Oven
- Place the sealed bag in the oven.
- Follow the specific temperature and curing time recommended by your machine manufacturer.
6. Cool and Inspect
- Allow the laminated glass to cool before removing it from the bag.
- Inspect the final product for imperfections.
Note: Using E-Seal bags is straightforward for operators, but it’s crucial to consult your machine manufacturer in advance regarding specific temperature and curing time requirements. Different machines from various manufacturers may have unique settings that need to be followed for optimal results.
Top Benefits of E-Seal Bags in Lamination Ovens
E-Seal bags offer numerous advantages that make them ideal for use in glass lamination ovens, ensuring high-quality results and operational efficiency.
- Superior Airtight Seal
The ribbed E-seal design creates a secure, airtight closure, maintaining vacuum integrity throughout the lamination process. This minimizes the risk of air leaks and ensures a flawless finish with minimal bubbles.
- Heat Resistance
Made from durable silicone rubber, E-Seal bags withstand temperatures up to 250°C, enabling them to perform reliably during the intense heat cycles in lamination ovens without warping or degrading.
- Flexibility and Conformity
Silicone’s natural flexibility allows E-Seal bags to conform closely to glass and interlayer materials, ensuring even pressure distribution. This tight fit is essential for achieving consistent adhesion, especially in multi-layer or thicker glass laminations.
- Reusable and Cost-Effective
E-Seal bags are designed for repeated use, making them a more cost-effective option than disposable bags. Their durability extends the bag’s lifespan, reducing replacement frequency and overall operational costs.
- Easy Handling and Maintenance
The non-stick properties of silicone prevent glass and interlayer materials from adhering to the bag, simplifying cleanup and reducing maintenance requirements.
These benefits make E-Seal bags an efficient, high-performance choice for glass lamination, supporting quality and reliability in demanding production environments.
Essential Tips for Proper Use and Maintenance
To maximize the lifespan and efficiency of E-Seal silicone vacuum bags in glass lamination, proper use and regular maintenance are essential. Here are key tips to follow:
- Regular Cleaning
After each use, clean the bag’s surface with a mild detergent and soft cloth to remove any debris, interlayer residue, or dust. Avoid using abrasive cleaners, which can damage the silicone.
- Inspect for Damage
Regularly check for any signs of wear, punctures, or weak points, especially along the seal edges and nozzle area. Small tears can compromise vacuum integrity, so replace or repair damaged bags promptly.
- Store Carefully
When not in use, store the vacuum bag in a cool, dry environment away from direct sunlight, as UV exposure can degrade the silicone over time. Lay the bag flat or roll it loosely to prevent creasing.
- Avoid Sharp Objects
During setup and lamination, handle the bag carefully to avoid contact with sharp edges of the glass or other equipment, which could puncture or tear the bag.
- Apply Sealant When Needed
If the E-Seal edges begin to show wear, a silicone-compatible sealant can be applied along the seams to reinforce the airtight seal, extending the bag’s usability.
By following these tips, you’ll maintain the bag’s performance, achieve consistent lamination quality, and maximize its service life in a high-temperature environment.
How to Choose a Reliable Supplier for High-Quality Vacuum Bags
Selecting a reliable supplier for high-quality vacuum bags is crucial for consistent, top-tier results in glass lamination. Here’s what to consider:
- Experience and Expertise
Look for suppliers with a strong background in vacuum bag manufacturing, particularly in glass lamination. Experienced suppliers are more likely to understand specific requirements, such as E-Seal bag designs and material durability.
- Quality Materials
Ensure the supplier uses high-grade silicone rubber known for its heat resistance, flexibility, and longevity. The materials should withstand high temperatures and maintain airtight seals during lamination.
- Customization Options
A reliable supplier will offer customizable solutions, such as different sizes, thicknesses, and nozzle configurations, to meet specific project needs. This flexibility ensures a tailored fit for your unique production setup.
- Technical Support
Choose a supplier with dedicated technical support, providing guidance on bag usage, maintenance, and troubleshooting. This support is essential to maximize bag performance and resolve issues promptly.
- Reputation and Reviews
Check client reviews, testimonials, or case studies to gauge the supplier’s reliability and product consistency. A reputable supplier will have positive feedback and long-term customer relationships.
By carefully assessing these factors, you can find a trustworthy supplier who delivers durable, effective vacuum bags that support consistent lamination quality and productivity.
How to Calculate the Actual Weight of a Vacuum Bag
Calculating the weight of a laminating vacuum bag involves considering its primary components—silicone sheets and E-sealing strips—while generally disregarding the negligible weight of hoses and nozzles. Here’s a step-by-step guide:
1. Determine the Dimensions
Measure the external size of the silicone sheets, including their length, width, and thickness. Since the bag comprises two layers, both layers must be accounted for. Here is an example bag with outer size 3mm X 2900mm X 5400mm, just for your reference.
2. Calculate the Silicone Sheet Weight
Use the formula:
Density (1.3g/cm³) × Thickness × Length × Width × 2 Layers
Example:
For a bag with external dimensions of 3mm × 2.9M × 5.4M:
1.3g/cm³ × 3mm × 2.9M × 5.4M × 2 = 122.15kg
3. Add the Sealing Strip Weight
Sealing strips contribute to the weight based on the bag’s perimeter and strip density. Use the formula:
(Length + Width) × 2 × 2 Layers × 0.5kg/M
Example:
For the same bag:
(2.9M + 5.4M) × 2 × 2 × 0.5kg/M = 16.6kg
4. Calculate the Total Weight
Add the weights of the silicone sheets and sealing strips to get the net weight (N.W.) of the bag:
122.15kg + 16.6kg = 138.75kg
The weight calculation is straightforward, influenced primarily by the bag’s dimensions. For tailored advice or specific requirements, contact us for assistance.
Best Practices for Packaging and Shipping
Proper packaging and shipping practices ensure silicone vacuum bags arrive in pristine condition and are ready for use. Follow these guidelines:
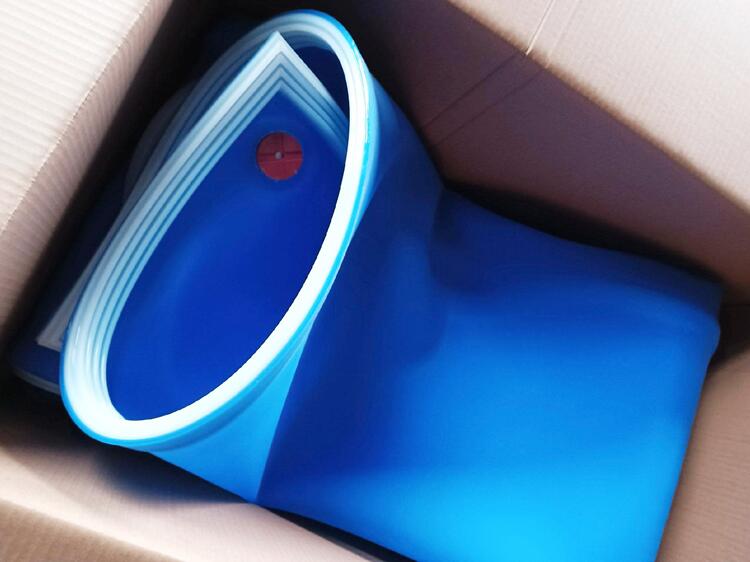 | 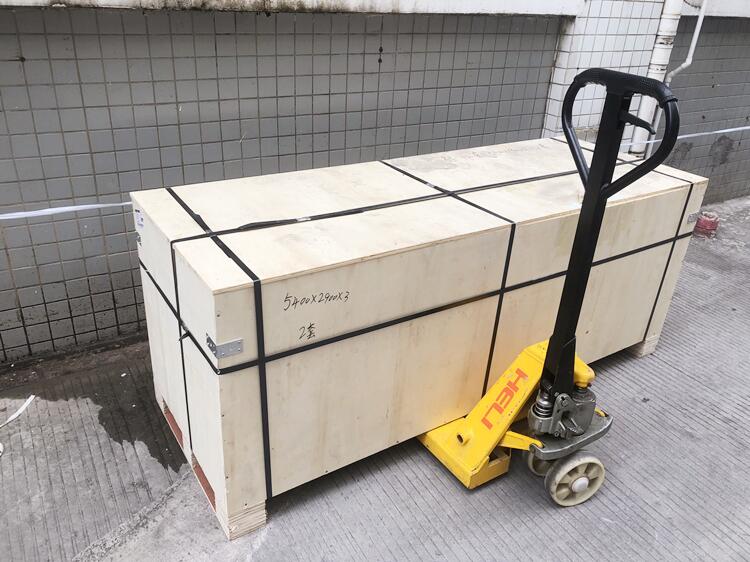 |
| Carton boxes for smaller bags | Wooden crates for larger bags |
1. Protective Wrapping
Wrap each bag in a protective layer, such as bubble wrap or foam padding, to prevent scratches or abrasions. Pay extra attention to the silicone surfaces and sealing edges.
2. Sturdy Outer Packaging
Place the wrapped bag in a durable carton box or wooden crate for added protection. Ensure the packaging can withstand external pressure, especially for larger or heavier bags.
3. Avoid Folding or Creasing
Store silicone bags flat or rolled loosely to prevent creases, which could compromise their performance. Avoid folding, as it may damage the silicone material and vacuum seal.
4. Clear Labeling
Label packages with “Fragile” and “Do Not Bend” indicators. If shipping multiple components, label each for easy identification upon arrival.
5. Secure Shipping
Choose a reliable shipping provider experienced with delicate industrial products. Consider insurance coverage to protect against loss or damage.
By adhering to these packaging and shipping practices, your vacuum bags will arrive safely and perform effectively in your lamination processes.
Frequently Asked Questions about E-Seal Bags
Here are some common questions about E-Seal silicone vacuum bags and their applications in glass lamination:
1. Do you offer standard sizes, or are all bags custom-made?
All our silicone vacuum bags are custom-made to fit your specific requirements. We do not keep standard sizes or stock pre-made bags. This ensures that the dimensions, thickness, and features of the bag align perfectly with your equipment and lamination needs. Provide your glass size or production details, and we’ll handle the rest.
2. Why should I choose an E-seal bag over a U-seal bag?
The ribbed E-seal design provides a tighter, more reliable airtight seal than U-seal bags. This makes them ideal for complex applications, including multi-layered or curved glass, where maintaining consistent pressure and vacuum integrity is crucial for quality.
3. How long will the bag last with regular use?
The lifespan depends on various factors such as machine type, operator skill, working temperature, and operating conditions. While we can’t specify an exact number of cycles, proper care—such as cleaning, careful handling, and avoiding sharp edges—can extend durability significantly. Need tips for maintenance? Contact us!
4. Can I get a sample or a smaller bag for testing?
Absolutely. We provide sample bags in smaller sizes (e.g., 500mm x 500mm) or according to your required dimensions. These samples allow you to test the bag’s compatibility and performance before placing a larger order.
5. What should I do if my bag gets punctured or damaged?
Minor punctures or tears can be repaired using silicone-compatible adhesives or sealants. For significant damage, we recommend replacing the bag to ensure consistent lamination quality. Our team can provide repair guidance or replacement options as needed.
6. What is the lead time for custom orders?
Custom orders typically take 7 to 15 days to manufacture, depending on the size and complexity of the bag. Shipping times vary based on location. We ensure clear communication and timely delivery for every order.
Have more questions?
If your inquiry isn’t covered here, feel free to reach out to us. Our team is always ready to assist, and we continuously update this section with new questions to provide the most comprehensive support.
Conclusion
After reading this guide, you’re practically an expert on E-Seal bags and their critical role in glass lamination.
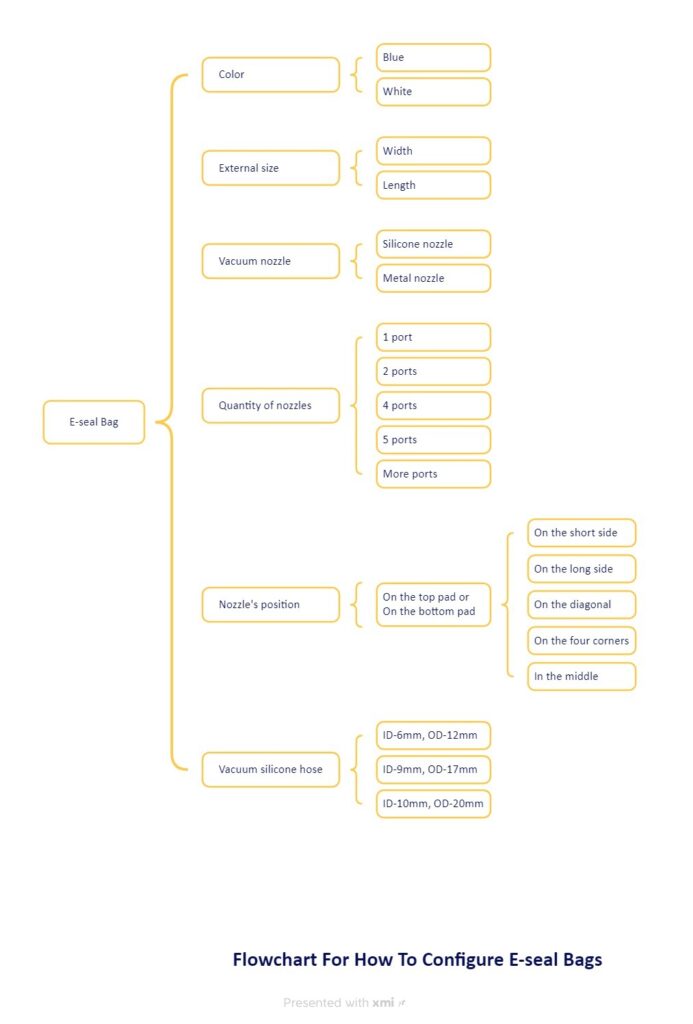
If you still have any doubts, please follow the step-by-step flowchart for how to configure E-seal bags outlined below to select the appropriate bag.
Now, here’s a quick challenge for you:
Do you know how to calculate the weight of a silicone vacuum bag with external dimensions of 3mm x 2M x 3M?
Take a minute to work it out! Once you’ve got an answer, click [here] to verify it.
Still have questions or need personalized assistance? Don’t hesitate to leave us a message. Our team is always ready to respond promptly and help you with any doubts or requirements.
Let us support you in achieving precision and excellence with E-Seal silicone vacuum bags!